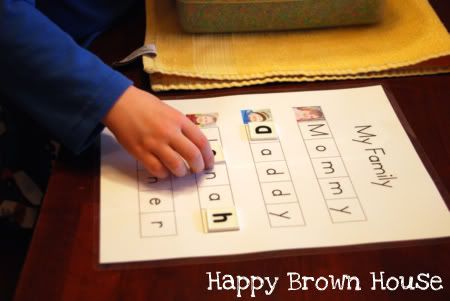
I recently made a Letter Tile Spelling Mat using the names of our family members, including pictures to make it easier for my four year old son to identify the names. The goal of the Letter Tile Spelling Mat is to match up the letters and "spell" words or names. I've used this before in my kindergarten class for various themes, but I wanted to make one that was personalized for our family.
The letter tiles we use at our house are the Eureka Tub Of Letter Tiles
Want to make your own Letter Tile Spelling Mat with your family's names?
First things first: I am not normally a printable maker. I don't have fancy software, nor do I know how to use fancy software. BUT, I had an idea and I successfully figured out how to make it using what I have on my computer. I thought I might share my process with you...just in case you're not normally a printable maker either ;)
The easiest way I could think of to explain how I made the Letter Tile Spelling Mat was to make a video and walk you through it. (If you are reading through email, you might have to click over to the blog post to see the video correctly. Trust me, it's worth it!)
If you are having trouble viewing the video, you can watch it here.
Basic Video Notes:
- Open a new document in Microsoft Word
- View gridlines to make it easy to line things up
- Insert a text box
- Size the text box to 1-inch square
- Format the font (I used Primer font, Size 72, Centered)
- Type your letter
- Copy and Paste the number of text boxes you need to spell the word
- Highlight and change the letters to spell the word
- Insert picture & Resize it
- Format Picture (*Instructions below, not in video)
- Line everything up
- Repeat for other words
- Once you are finished, you can play around with the spacing
- Laminate
- Play with Letter Tiles!
Letter Tile Spelling Mats can be made for different themes by using clipart. The possibilities are endless!
As my gift to you, I made a Construction Letter Tile Spelling Mat to go with this month's Big Machines theme. Head over to my blog to print it out. Laminate it and get it ready for Thursday's Once Upon A Book post. We'll be using it then. Enjoy!
Leave any questions you have in the comments and I'll try my best to answer them.


3 comments:
What a fun activity, we have those letter tiles so I can't wait to make some for the girls. Thanks for sharing the how to video!
You are welcome!
I don't have the letter tiles, but I need to find them. Also, thanks for the video. I have never used that feature on my Word document! I can't wait to make this for my son. He is really interested in spelling right now at 3.5. Sara- I just love your simple ideas! I always am excited to see the new ideas you share.
Post a Comment